Hope you're having a splendid day!
-Sarah
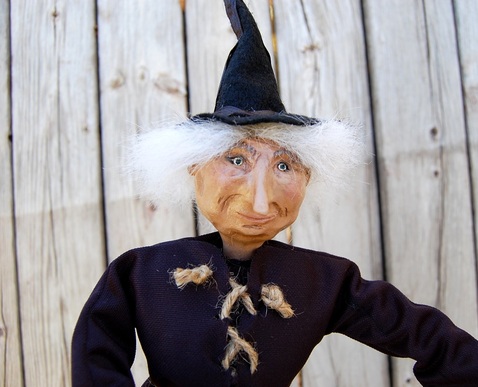
I have to share my latest creation with you all. I'm so excited with how she turned out! I know I say this a lot, but she is definitely one of my favorite creations :) I actually started her over a year ago when I had this brilliant idea to create a whole family of rod puppets. I only got as far as creating this guy... 
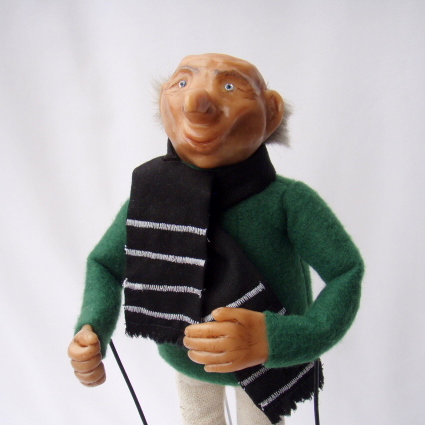
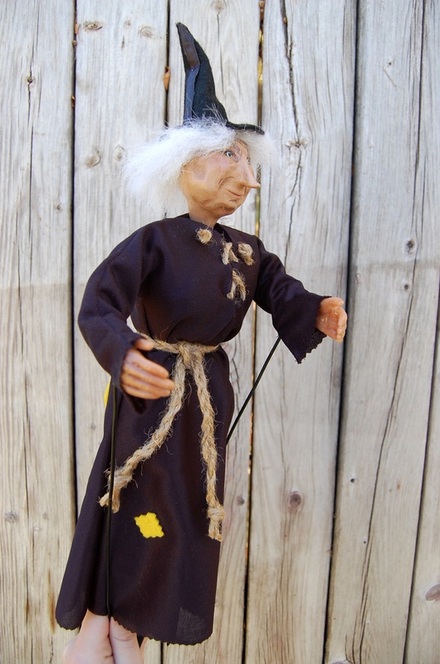
and the witch's head and hands. Long story short, I sold the old man puppet before I had the witch complete, so she took a back seat. Poor thing. It all worked out in the end, though. I think she turned out great! I really should make more of these puppets. They are so much fun to see come to life and really challenge my creativity. Too bad they take me so long. At this rate, we won't see another until next Halloween! By the way, if you're interested in purchasing this cute witch, she's available here.
Hope you're having a splendid day! -Sarah
0 Comments
There has been such a great response to the Monster Hat Pattern & Tutorial! It's been so exciting to see the interest in them- from people who are going to make their kids very happy for Christmas, to a kid wanting to make some for a school fair, to amazing women who use their sewing abilities to bless children in hospitals. Wow. It makes all the time it takes to do a tutorial worth it. I hope you all continue to enjoy the new monsters you've created!
~Susan These hats make me smile. I first started making and selling them over a year ago and my own kids happily kept warm and got the best looks and compliments all winter long while wearing theirs. So I decided to share the pattern and teach you how to make your own! They are very simple, so even beginners should be able to handle it. (And don't worry, you can still buy them in our etsy shop or order a custom one (including satin lined) here on the website if you don't have the skills or desire to sew one right now!) Supplies Needed: -1/3 Yard of Fleece in whatever color you want your hat -1/8 Yard/Scraps of White Fleece for the eyes and horns -Scraps of Black Fleece for eye pupils -Thread to match -Small amount of fiberfill stuffing for the horns -Tissue Paper -Pattern (Click below to download. Make sure to print Actual Size- not to fit)
This pattern is for personal use only. You may not repost or resell the pattern. You may not sell hats made from this pattern. You may link to this post. You may print it out and use it to make as many hats as you like to keep or give as gifts! Please enjoy responsibly :)
9. Now that your eyes are stitched on so nicely, you can rip the tissue paper right off the back and toss it! I originally learned this fleece applique technique from my sister-in-law Care. She has a great tutorial with some good tips on her blog at http://obsessivelystitching.blogspot.com/2009/10/fleece-applique-technique.html if you want to check it out (While your there you have to check out all the things she has made with this technique-especially the Angry Birds! Amazingly awesome!)
16. With right sides together, pin your main piece to the lining along the bottom edge. Seams should be pinned open and match on the sides. Stitch with 1/2" seam allowance.
19. Handstitch the gap in the lining closed and you are done! Congrats! Now go try it on your little monster! These are my favorite little monsters! Aren't they cute? But I'm not biased at all... The girl's hats include eyelashes and hair, as requested. According to them, you can't really tell it's a girl monster (or a girl anything!) unless it has eyelashes :) You can see more versions here. We picked the pumpkins in the garden today as an incentive to smile for some pictures-it worked. I think they are pretty happy, don't you? I know I was :) I hope you have as much fun with these hats as we have had! Happy sewing! ~Susan
Some of my favorite holiday memories involve making fun seasonal treats and doorbell ditching them at a neighbor's house. Last weekend, my husband and I decided to spread some Halloween goodness and leave some treats on a few doorsteps along with this little poem and a cute little phantom to hang on their door: “Good Evening My Friends” The greetings of ghosts are haunting your way. A curse will be left if you fail to obey. To ward off the curse of the dread Phantom wart, You have just one day until you must start. Take treats to two houses in your neighborhood. Be sure they are tasty, be sure they are good. Copy this letter and a phantom for each. Help spread the spirit to those you can reach. Post the ghost of the Phantom on your front door, So that others can see he has been here before. Join the fun of the season, keep him right there in sight. Share the spirit of giving ‘til Halloween night! THE PHANTOM I was lazy and borrowed the poem from a website (can't remember which--sorry!) and altered a free clipart I found through a google search. I could have been ambitious and created my own, but sometimes this is just what needs to happen. Anyway, feel free to use these and spread the phantom through your neighborhood! Grab the kiddos, the spouse, roommates, significant other, or whomever you can find and make an event out of it! Whip up a tasty Halloween or fall treat like cute frosted sugar cookies or my personal fall favorite, 2 ingredient pumpkin cookies (15 oz pumpkin + spice cake mix = insanely delicious. No joke), print these out, dress up like a bandit, and get your running shoes on. I think I had more fun with this as an adult than I did as a kid :) Happy Halloween! -Sarah Another set of custom monster hats went out today- this time with googly eyes and hair! So fun! I really enjoy making these hats- and I think you will too. I've got a tutorial for them in the works. Hopefully it will be up in a couple of days so that you have plenty of time to make one before Halloween or the cold sets in! Sound good?
Don't you love this little ghosty? He is super easy and super inexpensive to create! It seriously only took me 5 minutes, if that. Here's what you need:
1. Plug in your glue gun :) 2. Lay your two pieces of white fleece on top of one another and trace 1/4"-3/8" around the end of your finger. Cut around your traced line. 3. Sew the two pieces of white fleece together with slightly less than 1/4 inch seam allowance. (If you have trouble keeping your pieces together as you sew, go ahead and use a few pins to help) 4. Trim around the seam you've just sewn close to the stitching (the picture shows the finger sock before trimming) and turn inside out. It should slip easily onto your finger. If it's too tight, you can always cut it out again a little larger. This won't show on your final product, so don't worry about perfection. You just want it to fit. 5. Set your finger sock aside and pull out your cheesecloth. Cut out six 4"x4" sqaures and lay them on top of one another creating lots of crazy corners and edges for that ghostly effect. 6. Slip your finger sock onto your finger and put a layer of hot glue right on the end. 7. Grab your pile of cheesecloth, find the center, and lightly push it onto the end of your finger. You want to put enough pressure on it for the glue to grab all six layers without visibly seeping through. If you put too much pressure on it, you may also feel a bit too much heat on the finger underneath all the fabric, so please be careful. 8. Working around all sides of your finger sock, lay down four or five stripes of glue and press the cheesecloth down to create the desired shape. Again, be careful about putting too much pressure on the glue. 9. Glue on those googly eyes! Starting to look quite ghostly, isn't he? You can stop here if you like how he looks, or you can move on to the last step. 10. Cut a small circle or oval out of your scrap of black fabric, glue it on, and you are done! Now wasn't that easy?! These ghosts would be so much fun in a ghostly little puppet show with your little ones. They've also proven to be quite talented at peek-a-boo. I should mention that cheesecloth does pull apart easily and you'll find lots of strings left behind if it's handled roughly. If you're worried about that, try dipping the ends in mod podge or going over the edges with fray check. Happy Ghosting! Let me know if you have any questions. Also, please respect my rights as the creator of this ghost finger puppet and do not sell the final product or repost this tutorial or any of the pictures found here as your own.
Thanks for visiting! -Sarah Here is a set of custom order fleece monster hats that went out in the mail today! The woman who ordered them was looking for something that her biracial kids could wear that wouldn't catch on their hair and mess it up everytime. So instead of lining it with fleece, I lined it with a good quality lining material that was super sleek and nice. I had to add in some extra ease in the lining since the it doesn't stretch like the fleece, but other than that it was super simple and turned out really great! My kids got a kick out of trying them on for size and have asked to have theirs pulled out of the closet now that it is getting colder. October does seem like the perfect month to have little monsters appear at my house again! If you are interested in ordering one it is easier than ever with our new order form found here on the website!
~Susan This drawing made me so happy I thought I would share it.
While I was sewing marionettes the other day, my daughter was busy coloring and working on her own projects. I was delighted when she presented me with this artwork saying "See mommy, it's a puppet like you are making! Here is the stage and there is the "T" at the top that you hold and all the strings. But mine is not a dragon, it's Dude. He would be a good puppet." I love her imagination! This drawing is on the wall by my sewing machine now. It makes me smile and it will be good inspiration, though I don't think I will make a marionette that looks like my baby boy any time soon :) ~Susan |
AuthorsSarah & Susan-Two creative puppet loving sisters just sharing what we know, what we do, and how we create. Click here for more about us. TutorialsCategories
All
Archives
July 2015
Websites We Love |